Choosing between manual and auto digitizing can significantly impact your embroidery business success. Both methods have distinct advantages, and understanding which works best for your needs is crucial for producing quality custom embroidery designs while maintaining profitability.
Understanding Embroidery Digitizing
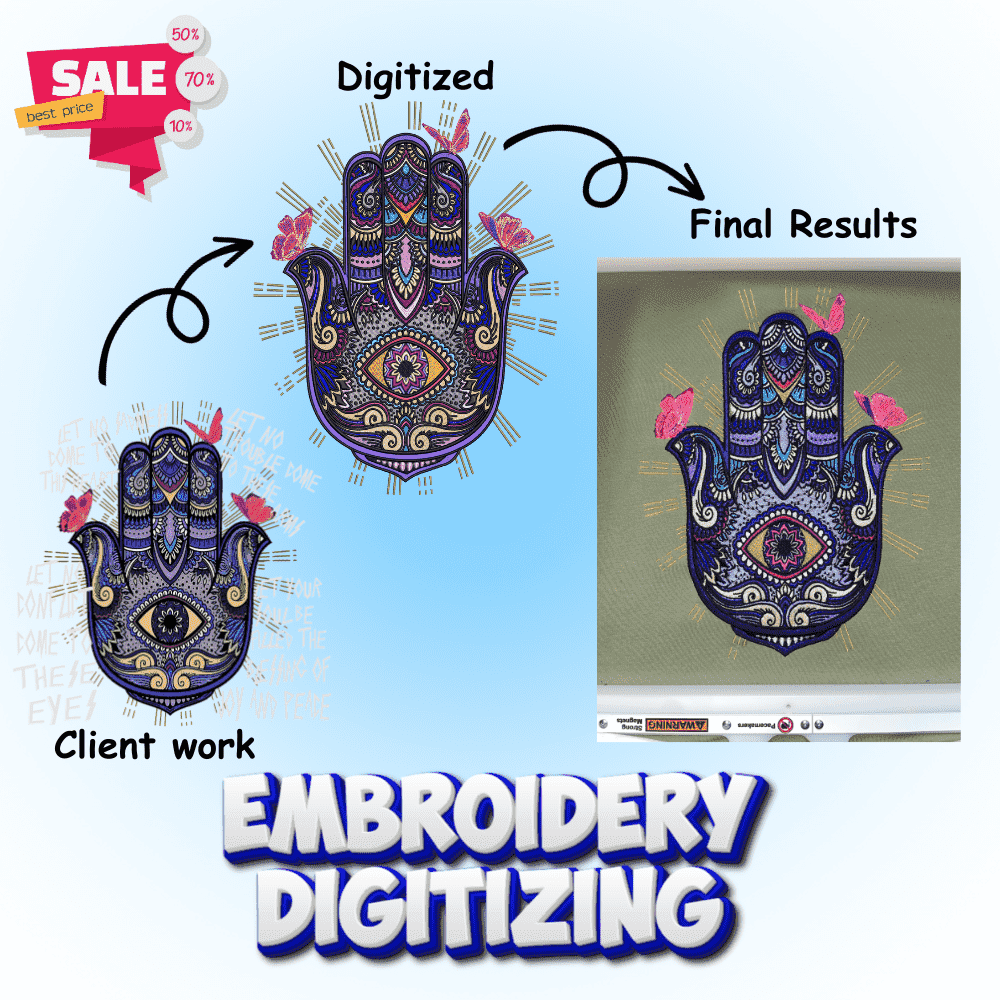
Embroidery digitizing converts artwork into digital files that embroidery machines can read and execute. This machine embroidery digitizing process involves translating visual designs into precise instructions about stitch types, directions, density, and sequence. Without proper digitizing, even the most advanced embroidery machine cannot produce professional results.
What is Auto Digitizing?
Auto digitizing uses embroidery digitizing software that employs algorithms and AI to automatically convert images into embroidery files. Modern embroidery design software like Hatch Embroidery, Wilcom, and Brother PE-Design include powerful auto-digitizing features that can transform a logo into an embroidery file within minutes.
Advantages of Auto Digitizing
Speed and Efficiency: Auto digitizing completes simple logo digitizing in 5-15 minutes compared to hours of manual work. For custom embroidery businesses handling high volumes, this speed advantage directly increases profitability and allows faster turnaround times.
Cost-Effective: After investing $200-$2,000 in quality embroidery digitizing software, the per-design cost drops to nearly zero. Compare this to professional digitizing services charging $15-$100 per design, and the savings become substantial. A business digitizing 50 designs monthly at $25 each spends $15,000 annually quality software pays for itself within weeks.
Consistency: Auto digitizing applies uniform settings to every design, ensuring consistent results. This reliability is particularly valuable for corporate branding where left chest logos must look identical across hundreds of garments.
Beginner-Friendly: Auto digitizing reduces the learning curve for machine embroidery digitizing, allowing newcomers to start producing embroidered products while developing advanced skills. Many successful embroidery businesses began with auto methods.
Ideal for Simple Designs: Text-based designs, basic geometric shapes, simple company logos, and monograms are perfect candidates for auto digitizing. Software handles these clean, straightforward graphics exceptionally well.
Limitations of Auto Digitizing
Complexity Issues: Intricate details, gradients, photographic elements, and artistic nuances often fail with auto digitizing. The software creates excessive stitches in some areas while leaving gaps in others. Complex jacket backs typically require extensive manual editing, sometimes taking longer than manual digitizing from scratch.
Lack of Artistic Control: Auto digitizing follows programmed rules but cannot replicate the creative judgment of experienced embroidery digitizers. Software cannot determine when to break conventions for better visual impact or how to create depth through clever stitch placement.
Technical Problems: Auto-digitized files frequently contain excessive stitch counts that increase production time, poor underlay placement causing registration problems, too many jump stitches slowing production, incorrect push-pull compensation for fabric stretch, and dense fills creating stiff, board-like embroidery.
Limited Fabric Adaptability: Different fabrics require different approaches. Cap embroidery needs denser stitches than polo shirts. Towels require specialized underlay. Auto digitizing typically applies generic settings that may not optimize for specific applications.
What is Manual Digitizing?
Manual embroidery digitizing involves skilled digitizers using professional embroidery design software to create files node by node. The digitizer controls every aspect from foundational underlay to final top stitching. This method remains the gold standard for high-end custom embroidery designs.
Advantages of Manual Digitizing
Superior Quality: When quality is non-negotiable, manual digitizing delivers. Experienced embroidery digitizers reproduce intricate details, create depth through strategic stitch placement, match thread colors perfectly, and achieve photo-realistic results when needed. For premium custom embroidery businesses, this quality difference justifies the investment.
Complete Creative Control: Manual digitizing empowers artistic choices that elevate designs beyond mere reproduction. Digitizers adjust stitch directions for visual flow, incorporate specialty techniques like appliqué digitizing for dimensional effects, use gradient fills for sophisticated looks, and add custom underlay patterns for unique textures.
Fabric-Specific Optimization: Manual digitizers adjust approaches based on fabric characteristics. They increase density for cap embroidery with foam backing, add compensation for stretch fabrics, reduce density for delicate materials like silk, and use special techniques for towel embroidery pile.
Production Efficiency: Properly digitized designs run efficiently on machines, minimizing thread breaks, reducing production time through optimized sequences, using fewer trims and color changes, and creating stable embroidery that withstands washing and wear.
Advanced Techniques: Manual digitizing enables 3D puff embroidery, multi-level appliqué, chenille effects, specialty underlay for challenging fabrics, and custom stitch effects capabilities auto methods cannot replicate.
Limitations of Manual Digitizing
Time Investment: Simple designs require 30-60 minutes, while complex jacket backs can take 4-8 hours. For businesses with tight deadlines or high volumes, this time commitment poses challenges.
Requires Expertise: Professional machine embroidery digitizing skills require months or years of practice, understanding of embroidery mechanics, artistic sensibility, and technical software proficiency. Training staff represents substantial investment.
Higher Costs: Professional embroidery digitizing software like Wilcom or Tajima costs $1,000-$10,000+. Hiring digitizers requires $15-$50 per hour. Even outsourcing to professional digitizing services costs $15-$100 per design.
Variable Quality: Unlike auto digitizing’s consistent output, manual quality depends entirely on digitizer skill level. Novices might produce inferior results despite spending hours on designs.
The Hybrid Approach: Best of Both Worlds
Most successful custom embroidery businesses strategically combine both methods. Use auto digitizing for 70% of simple work including basic logos and text, then reserve manual digitizing for 30% of complex projects like detailed artwork and premium designs. This approach balances efficiency with quality while managing costs effectively.
Recommended Workflow: Start with auto-digitizing for simple elements to establish basic structure quickly. Manually refine critical areas by optimizing stitch angles, adjusting density for fabric, and minimizing jump stitches. Add custom underlay and proper compensation, then always test-stitch on actual fabric before production.
Making Your Decision
Choose Auto Digitizing If: Your business focuses on simple logo digitizing with straightforward designs. Speed and volume matter more than artistic perfection. Budget constraints limit software and training investment. You’re building foundational skills while serving customers.
Choose Manual Digitizing If: You target premium markets where quality justifies higher pricing. Your custom embroidery designs involve complexity and artistic elements. You work with jacket backs, specialty applications, and diverse fabrics. Superior quality is your competitive advantage.
Choose Hybrid Approach If: Your custom embroidery business handles diverse project types. You need a balance between speed and quality. Your market includes both price-sensitive and quality-focused customers, requiring maximum versatility.
Top Software Options for 2026
Professional Grade: Wilcom Embroidery Studio 2026 ($1,995-$10,000+) remains the industry standard. Hatch Embroidery Digitizer 3 ($199-$999) offers professional capabilities with approachable pricing.
Mid-Range: Embrilliance Essentials ($149-$399) provides modular software that grows with your business. Embird ($150-$600) delivers excellent value with 70+ file format support.
Free Options: Ink/Stitch offers completely free, open-source embroidery digitizing for beginners learning basics.
When to Outsource
Even with in-house capabilities, outsourcing to professional digitizing services makes sense for occasional complex projects beyond your expertise, capacity overflow during busy periods, specialized techniques like advanced appliqué digitizing, and when you lack in-house digitizing skills.
Top providers include Absolute Digitizing ($15 flat rate), PRO Digitizing (20+ years experience), and MIG Digitizing ($1.50/1,000 stitches). Most services offer a 12-48 hour turnaround with 1-2 free revisions included.
Expert Tips for Success
For Auto Digitizing: Always use high-quality vector files when possible. Start conservative with density settings. Preview designs in simulation mode before production. Manually remove excessive nodes and optimize stitch sequences.
For Manual Digitizing: Plan stitch sequence before starting. Choose appropriate stitch types for different elements. Adjust density based on fabric type lighter for t-shirts (4-6 points/mm), heavier for canvas (6-8 points/mm), denser for cap embroidery (7-9 points/mm).
Universal Best Practices: Target 10,000-15,000 stitches for left chest logos. Limit designs to 7-9 colors for efficiency. Always test-stitch on actual fabric and thread before production runs. Document successful settings for future reference.
Common Mistakes to Avoid
Never blindly trust auto-digitizing one-click solutions, always review and edit results. Avoid using low-quality source images that produce poor results. Don’t ignore fabric considerations; different substrates need different approaches.
For manual work, avoid over-digitizing with too many nodes creating stiff embroidery. Ensure proper underlay to prevent registration problems. Follow natural stitch direction for visual flow. Design for efficient production without excessive color changes.
Conclusion
There’s no universally “better” method; the right choice depends on your specific situation. Auto digitizing saves time and money for simple designs. Manual digitizing ensures superior quality for complex work. Smart businesses use both strategically, leveraging each method’s strengths.
Start by assessing your needs honestly. Try free software options to experience digitizing firsthand. Test paid software through free trials. Compare results and costs against your business goals. Invest in appropriate embroidery digitizing software for your level, commit to continuous learning, and always prioritize quality.
FAQs
Q1: What is the difference between manual and auto digitizing?
Manual digitizing requires skilled embroidery digitizers to create designs stitch-by-stitch, while auto digitizing uses embroidery digitizing software to automatically convert images into embroidery files.
Q2: How much does embroidery digitizing software cost?
Embroidery design software ranges from free (Ink/Stitch) to $149-$399 (entry-level), $200-$1,000 (mid-range), and $1,995-$10,000+ (professional like Wilcom).
Q3: Is auto digitizing good enough for professional work?
Auto digitizing works well for simple logo digitizing but complex custom embroidery designs require manual digitizing for professional quality.
Q4: How long does it take to learn manual embroidery digitizing?
Basic skills take 2-3 months, while professional-level machine embroidery digitizing expertise requires 6-12 months of consistent practice.
Q5: Should I outsource to professional digitizing services or DIY?
Outsource for complex projects or occasional needs; build in-house capability if digitizing 50+ designs monthly for cost savings.
Q6: What file formats do embroidery machines use?
Common formats include DST (universal), PES (Brother), JEF (Janome), EXP (Melco), and HUS (Husqvarna).
Q7: Can I convert any image into embroidery automatically?
Yes, but simple vector images work best; complex photos and artwork need manual digitizing for quality results.
Q8: How many stitches should a left chest logo have?
The optimal range is 10,000-15,000 stitches for balancing detail with production efficiency.
Q9: What’s the best embroidery digitizing software for beginners?
Ink/Stitch (free), Hatch Essentials ($199), or Embrilliance Essentials ($149) are excellent beginner-friendly options.
Q10: How much do professional digitizing services charge?
Professional embroidery digitizing services charge $15-$100 per design based on complexity, with simple logos at $15-$30.
Q11: What’s better for starting an embroidery business?
Start with affordable auto digitizing software ($200-$500), outsource complex work, then develop manual skills as your custom embroidery business grows.
Q12: Can auto digitizing handle appliqué designs?
Basic appliqué digitizing is possible with auto methods, but manual digitizing produces significantly better results.
Q13: How important is underlay in embroidery digitizing?
Underlay is crucial as it stabilizes fabric, prevents shifting, and reduces puckering for professional embroidery results.
Q14: What’s the learning curve for embroidery digitizing software?
Auto features can be learned in days, basic manual digitizing takes 2-3 months, and professional proficiency requires 6-12 months.
Q15: Should I use the hybrid approach for my embroidery business?
Yes, auto-digitize 60-70% of simple designs for speed and manually digitize 30-40% of complex work for quality.